Friday, December 14, 2012

Fix it up

My current decorating project is my master bedroom. It has a hollywood regency vibe... lots of black laquer furniture, and gold accents. I have been on the hunt for two matching nightstands that would fit into my vision. Below are some photos of they type of thing I was looking for, which I kept around for inspiration.
Available at Pegaso Gallery Design for 3,200.00
click here for more details

Available at Dixon Lane Antiques for 2,850.00
click here for more details


Well, my patience paid off. After months of looking, I finally came across a couple of nightstands at  a Denver Gypsy Boys estate sale. 
This is what I found...

YUCK!
They were dirty! They were moldy! And they didn't even have a top surface! In the past I was always hesitant to buy furniture that was damaged, too dirty, or moldy! But I learned that a little bit of elbow grease and know-how can rescue pieces like these, bring them back to life, and save me a lot of money along the way. Since they were in such bad condition, nobody else bought them during the first two days of the estate sale. So there they were still around on Sunday, at half price! Originally 80.00, they ended up only being 40.00 with the Sunday discount!
Let the clean up begin!

A little trick I learned from a professional antique refinisher... just get a bowl of warm water, and add a tablespoon or so of bleach. Wipe down the furniture, and the mold is gone! 
 

WOW! Look at that clean up swell! I followed up with a final cleaning of Pledge. I wiped them down inside and out! For the missing top, Gypsy Vince told me, "Just buy some MDF and spray paint it black." Well it sounded easy enough, so that is what I did. I found some MDF at Home Depot, and they cut it down to size for me. It ended up being about 6.00 a piece. A couple coats of high gloss spray paint and I was done. Thanks, Vince!

Now I am one step closer to my dream bedroom. I have more plans to paint the walls... so I will keep you updated and add photos of that soon! 


Thursday, December 6, 2012

A mini collection

My very first collecting bug started with miniature bottles. I was on vacation in Pennsylvania to visit my grandmother, and we went into an antique shop. Scattered about I found some colorful, miniature bottles. I thought they were the coolest, cutest things I had ever seen! Plus they would be easy to pack up to bring home! I bought 4 or 5 of them... and so the addiction began.

25 years later, my collection has grown and I have put them on display in my guest powder room. I used an old type tray hung on the wall... a great way to display small items.


My most recent finds have been at Denver Gypsy Boys Estate Sales. Usually I just find one random mini bottle, but recently I found a grouping of a few Ruby Red mini bottles. I snatched 'em up. (Don't even get me started on my Ruby Red collection!)


Many 19th century manufactures created miniature samples of their goods in order to promote their product. Miniature bottles would commonly contain alcohol, medicine, bitters, and soda. They came in all shapes including fish, horseshoes, liberty bells, ball and claw, and barrels. Part of the fun of this easy collection is finding new shapes in new colors.


Because of all the colorful options, they also look beautiful displayed on a window sill. Miniature bottles are small, affordable (I pay anywhere from 1.00 - 7.00 per bottle), and easy to display.

Do you have a mini bottle collection? Email me photos and I will post them on the blog!

Monday, December 3, 2012

Cupcakes and Christmas

Ok, here is a little trick I learned from surfing the internet. Take an ordinary strand of Christmas lights, add a cupcake liner... and you have a modern light reflector!
First I found some vintage cupcake liners from a Denver Gypsy Boys Estate sale. These puppies were priced at only 50 cents. And to be honest, I only bought them because I liked the retro packaging. Sometimes you just have to buy things because they call out to you... finding a use for them will always come up eventually! For this project, your cupcake liners don't have to be vintage... but that's just how I roll.
Next, get yourself a standard sting of holiday twinkle lights. I actually bought these rainbow ones at a Gypsy sale last year. I needed the white strands since my faux tree was white. (Faux sounds so much better than fake). It's always a good idea to shop for holiday decor year 'round. It's a great way to save money buying things out of season. Items will always be priced higher if they are being sold near the time of the holiday.
Now the fun part. Just poke the light through the center of the cupcake liner. Do this a few million times and you're done! It just makes the lights look larger, brighter and merrier! 


Now don't judge my tree just yet! I am only getting started. I still have to add my vintage star, and tons of vintage Shiny Brite Christmas bulbs....
This method also works great for lights around the mantel or bannister. 


Wednesday, November 28, 2012

Trash to Treasure! Painted and embellished furniture

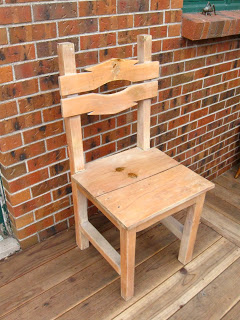
My wonderful, whimsical, and artistic cousin commissioned my to create this chair for her.
This is how I did it!
1) Buy a chair. From a Denver Gypsy Boys Estate sale of course! This basic wood chair was priced at 10.00.
2) Sand down any shiny surfaces. I used an electric sander. You don't have to be exact or extra thorough about it, you just want to rough up the surface so the paint will stick. 

3) Dust off any debris. I use a large paint brush so it can get in all the nooks and crannies. Use a damp cloth for any sticky or dirty spots. 
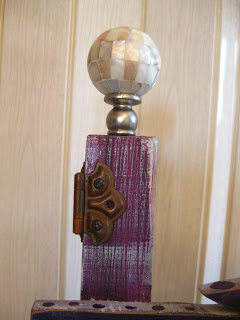
4) Now think of your design or theme. Gretchen came up with the original look from something she saw in Somerset magazine (Volume 5 2010, pg 94, "Black & White" by Allison Berringer). She wanted eggplant as a main color. Gretchen is a dancer, so I threw in some touches that had to do with dance. I found an old "How to Dance" illustrated book, and color copied some things from there. I also collected old hardware, old jewelry, and bought some flat backed rhinestones. Gypsy Boys Estate sales are the perfect place to find old jewelry and hardware to use for embellishments. 
5) Spray paint the chair with primer. I used Rustoleum. Again, it doesn't have to be perfect, just enough to get a good base. 
6) I painted on my main colors of eggplant and plum in various designs. For the seat of the chair I used a scrapbook paper that had a laser cut stencil design. I simply painted over the paper to make the stenciled look, then threw away the paper.
7) I sponge stencils to add more interest and design. Just paint directly onto stencil, then stamp onto chair. Let it all dry.
8) I then used scrapbook paper, and copied pages from the old book to decoupage. I cut out an Eiffel Tower image from a scrapbook paper, cause Gretchen loves Paris. I used Modge Podge - just apply some to the back of paper, stick down, then liberally cover the top of the paper. Go ahead and get messy.
9) To add some more interest, I used a colored pencil (in this case white) to scribble some designs, phrases, and quotes.
10) I then used a dry brush technique to go over any dark colors and paper. Dip a brush into a lighter shade of paint. I used white. Wipe off most of paint onto a paper towel. Then lightly lightly brush over chair. Any wood grain or raised areas will get accented.
11) Now it is time to distress. Make sure all paint and decoupage is dry. Use sandpaper to sand off edges, sand off some of darker paint (the white primer will show through), even sand some parts of decoupaged paper to roughen it up a bit.
To make the colors look a bit aged, apply some antiquing glaze. I use Valspar antiquing glaze available at Lowes Home Improvement. Just pour some on an old rag, and rub all over. Wipe away excess.
12) Finally, I added some embellishments. I included old hardware, old vintage jewelry, and rhinestones. I attached 2 curtain finials to the top of the chair.

Trash to Treasure!


Monday, November 5, 2012

Make a Vintage Christmas Wreath

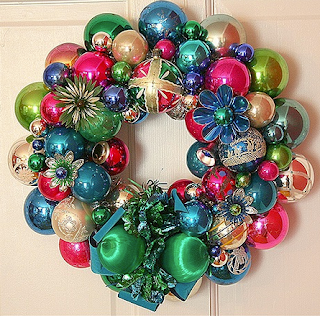
Now is the perfect time to hit up estate sales to buy some vintage Christmas decorations. Get out your glue gun and get ready for some crafts! You can make some beautiful Christmas wreaths with vintage christmas ornaments and decor.

These two wreathes are examples from retrorenovation.com
to get step by step instructions for these, click here

Below are some photos of MY creations. All of the vintage ornaments and trinkets I purchased from Denver Gypsy Boys Estate Sales
Handmade vintage christmas wreath by Stephie D

I made this Christmas wreath as a gift for my BFF

This was my attempt at a Christmas ornament bouquet!

Here are some more pics of some of my Denver Gypsy Boys Estate sale finds! I can't wait to get started on some more crafty projects...


Monday, October 29, 2012

The Look for Less

How do you get the look for less? Shop at estate sales!

Lately I have been obsessed with Hollywood Regency style home decor. Hollywood Regency is an over the top, eclectic and glamorous design style. This vibe came about in the 1930s when Hollywood set designers started decorating the homes of movie stars with the same drama and theatrics that went into their sets. Think ornate details, laquer surfaces, bold patterns, rich textures, brass and chrome, tassels, faux bamboo, pure whites, and vibrant colors.... all mixed together!

This style is having a resurgence in modern home decor, and it can get expensive. So I opt to find some original vintage pieces... and where better to look than at estate sales. I have found that the Denver Gypsy Boys have a lot of clientele that are clearing out homes filled with bold vintage pieces. In the setting of a neglected and out of date house, these pieces can get lost. But if you have an eye for fabulousness, you can pick out some treasures that will actually look quite modern in your home decor.

My latest find is a iron and glass bar cart. I actually saw one online at 1stdibs.com, and it cost a fortune!

As seen on 1stdipbs.com for 1300.00
From Gypsy Boys Sale - 45.00


Imagine my excitement when I came across one at a Gypsy Boys sale for 45.00! It has been painted white, but my dining room happens to have a white theme... so I was in luck!


Here are some other wonderful Hollywood Regency finds from Gypsy Boys estate sales..

Bamboo Lamp in my dining room
 Gypsy Boys sale - 8.00
(Shade from Target for 14.99)
Bamboo Lamp - High Street Market - 139.00
As seen on ApartmentTherapy.com


Vanity Bench in my guest room - Gypsy Boys sale - 16.00
Vanity Bench
As seen on Ebay for 75.00


Faux bamboo mirror in my guest room
Originally cream color - 20.00
(I spray painted black)
Faux Bamboo mirror
Ballard Designs 199.00
As you can see.... with a discerning eye, you can find some great designer looks for less! 

Tuesday, October 23, 2012

Start a collection!

I have a TON of collections. I got inspired for this next collection after receiving a few of my grandmother's old kitchen utensils. I hung them on the sophet of my kitchen for display. I soon got obsessed with old kitchen utensils, especially strange looking contraptions, or ones with the red handles.

Did you know you that as a general rule, you can date old kitchen utensils with red painted handles to about the 1950s, and ones with green painted handles to the 1940s?

When I have guests at my home, we always have a fun time trying to guess what some of the strange looking tools were used for... like a french fry cutter, ravioli maker, and pasta cutter.

This particular collection is fun and inexpensive. Being on the hunt for utensils I don't already have is a big part of the adventure. And the Gypsy Boys sales always have a big box of kitchen utensils ranging from 50 cents to a couple of dollars.

Add some charm to your kitchen decor with your own utensil collection. You can also think of themes, like only collecting rolling pins, or ice cream scoops. But if you are after utensils with red handles, you better beat me to the sale!